Thinking about turning your old CDs into a modern music library? You've probably discovered you can't just copy the files. To properly turn CDA files into MP3, you have to use a process called "ripping." This is simply using software to pull the actual audio from the disc and convert it into a format you can actually use, like an MP3.
Why You Can't Just Copy CDA Files
If you've ever popped an audio CD into your computer, opened the folder, and tried dragging the files to your desktop, you've probably had a moment of confusion. The files, all ending in .cda, transfer in seconds but are completely silent and unplayable.
It’s a common mistake, and the reason is surprisingly simple: those aren't the actual songs.
The Truth About CDA Files
A CDA file isn't an audio file at all. It's just a tiny, 44-byte shortcut that Windows creates to point to where a track is located on the physical disc.
Think of it like a signpost on a highway telling you where the next exit is—it’s not the exit itself. The real music is stored in a completely different, uncompressed format on the CD.
Copying the .cda file is like taking a picture of the signpost. It tells you where the music was, but it doesn't bring the music with you. This is why you must use a dedicated process known as ripping. Ripping software doesn't bother with the shortcuts; it goes directly to the disc, reads the raw audio data from the tracks, and encodes it into a brand new, self-contained MP3 file. You can dig into a more technical explanation from Microsoft if you're curious about the specifics.
This decision tree breaks down the fundamental choice you face.

As the flowchart makes clear, having the physical CD is the non-negotiable first step.
What Is CD Ripping?
Ripping is the technical term for digitally extracting audio from a CD and converting it into a file format your computer or phone can actually store and play. It’s the essential bridge between your physical media and your digital library. Without it, your music stays locked on the disc.
Key Takeaway: You can't convert a CDA file that's already been copied to your computer. The conversion process—the rip—has to happen with the original audio CD in the disc drive.
Once you rip your CDs, you can:
- Create a digital backup of your entire music collection.
- Listen to your CDs on devices without a disc drive, like your phone or a modern laptop.
- Organize your music into playlists and libraries in apps like Spotify or Apple Music.
- Preserve your music from the inevitable scratches and damage that happen to physical CDs over time.
Learning how to turn CDA files into MP3 is really just about understanding this crucial first step. It's not about converting the shortcut; it's about extracting the source.
Using Windows Media Player to Rip Your CDs
For many Windows users, the best tool for the job is one you already have. Windows Media Player, a classic part of the OS, has a built-in CD ripping feature that’s perfect for turning those .cda files into MP3s without downloading a thing. It’s a straightforward, no-fuss option that just gets the job done.
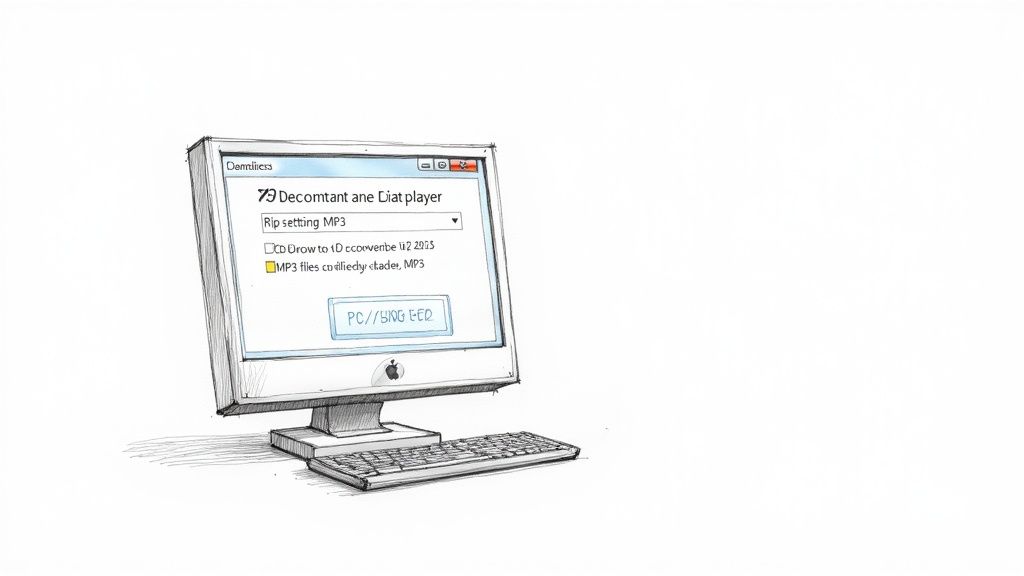
The moment you pop in an audio CD, Windows Media Player should spring to life, recognize the disc, and show you the tracklist. From here, you’re just a couple of clicks away from converting your music.
The trick is to find the "Rip CD" button. It usually appears right at the top of the window once a disc is loaded. Clicking this is what actually starts extracting the audio, turning those useless shortcuts into real, playable music files.
Configuring Your Rip Settings
Before you hit that button, it’s a good idea to spend 30 seconds checking your settings. This is where you tell the software exactly what kind of file you want and at what quality. A little prep here saves you from having to redo it all later.
Find the "Rip settings" option in the toolbar. Clicking it opens a dropdown menu with a few crucial choices that will shape your new digital library.
Here’s what you need to look for:
- Format: This is the big one. It might default to WMA (Windows Media Audio), but you’ll want to switch it to MP3.
- Audio Quality: This is usually a slider with bitrates from 128 kbps all the way up to 320 kbps.
- Rip CD automatically: A handy toggle that tells WMP to start the job as soon as you insert a disc.
- Eject CD after ripping: Another nice time-saver that pops the disc out for you when it's finished.
Choosing MP3 from the format list is the key step in learning how to turn cda files into mp3 with this built-in tool.
Pro Tip: For most people, a bitrate of 192 kbps offers the perfect balance of great sound and manageable file size. If you're an audiophile with high-end gear or you're creating a permanent archive, just crank that slider all the way up to 320 kbps.
Finalizing the Conversion
Once your settings are dialed in, the rest is a piece of cake. Just click the "Rip CD" button.
Windows Media Player will then get to work, moving through each track on the album. You'll see a progress bar for each song as it converts the raw CD audio into a proper MP3 file. The best part? It automatically saves everything to your Music folder, neatly organized by artist and album.
A Reliable Ripping Method with VLC Media Player
Most people know VLC Media Player as a do-it-all video player, but it’s hiding a powerful secret. This free, open-source workhorse, available for both Windows and Mac, is also a surprisingly capable CD ripper. If you already have it installed, you can skip downloading new software and get the job done with a tool you're already familiar with.
The process isn't front-and-center, but it's straightforward once you know where to look. Instead of a simple "Rip CD" button, VLC uses its more versatile "Convert / Save" feature. This screen is your control center for turning disc tracks into digital files.
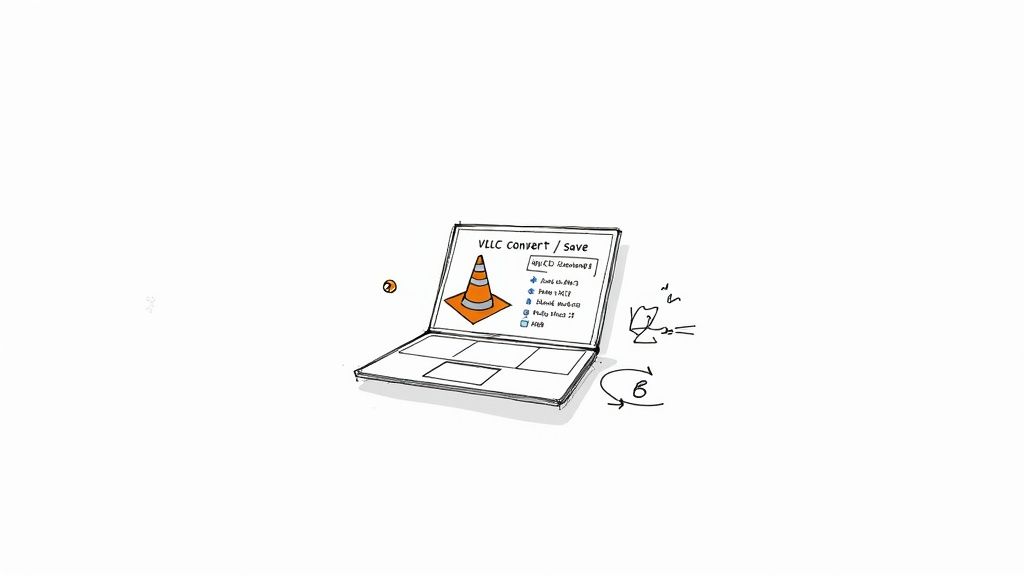
Navigating the Conversion Process
So, how do you actually turn CDA files into MP3 with VLC? It’s simple once you know the steps. First, pop your audio CD into the drive.
With VLC open, head to the Media menu at the top and click on Convert / Save. This opens a new window where you'll want to switch from the default "File" tab over to the "Disc" tab.
Make sure "Audio CD" is selected and that VLC has picked up your disc drive. You can also tell it which track to start from if you don't feel like converting the entire album right now.
A Quick Tip: A common hiccup is VLC not seeing the disc drive. If this happens, try restarting VLC with the CD already in the drive. Sometimes that simple reboot is all it needs to recognize the hardware.
Once you have your disc selected, click the Convert / Save button at the bottom of the window.
Setting Up Your MP3 Profile
This next screen is where all the magic happens. You’re telling VLC exactly how you want your final files to sound and where to put them.
- First, find the Profile dropdown menu and select "Audio - MP3". This sets the basic instruction: create an MP3 file.
- Next to that dropdown, you’ll see a small wrench icon. Click it to open the Profile edition settings. This is where you can fine-tune the quality.
- Inside, click on the "Audio codec" tab. Under Bitrate, you can set your desired audio quality. I find that 192 kbps is a fantastic all-around choice for great sound and reasonable file sizes, but if you’re archiving your collection, go for 320 kbps to get the best quality possible.
All that's left is to tell VLC where to save the file. Click "Browse" next to Destination file, pick a folder, and give your new file a name—just be sure it ends with .mp3.
Hit "Start," and VLC will get to work.
Remember, converting CDA files to MP3 is primarily for creating personal backups of music you already own. For more on the accepted practices around this, check out this great overview on the personal use nature of CD ripping on tptranscription.co.uk.
Advanced Ripping for High-Quality Audio Archives
When your goal shifts from just getting music onto your computer to creating a flawless, bit-perfect digital archive, standard media players just don't cut it. This is where you graduate to specialized software, tools built for audiophiles who demand absolute precision and control.
For anyone serious about archiving their collection, two free programs are legendary: Exact Audio Copy (EAC) for its painstaking accuracy and fre:ac for its incredible speed and versatility.

These applications are engineered from the ground up to tackle the unique challenges of ripping audio, especially from older CDs that might have a few scuffs. Their feature sets go far beyond what you'll find in a general-purpose media player.
The Gold Standard Exact Audio Copy
For decades, Exact Audio Copy (EAC) has been the undisputed king for audiophiles. Its secret weapon? A feature called "secure ripping."
A normal ripper just reads the data from the disc once and hopes for the best. EAC, on the other hand, is paranoid—in a good way. It reads every single section of the disc multiple times, meticulously comparing the results to ensure there are zero errors.
If it finds a mismatch, often caused by a tiny scratch or speck of dust, it stubbornly re-reads the section until it gets a consistent, perfect result. This process is slower, no doubt, but it's the only way to guarantee a bit-perfect copy of the original master. For archival purposes, that peace of mind is priceless.
Fast and Flexible with fre ac
What if you have a massive CD collection to digitize and EAC's methodical pace feels too slow? That's where fre:ac (Free Audio Converter) comes in. It's an amazing open-source tool that absolutely crushes batch conversions, letting you rip dozens of CDs or convert entire folders of audio files with just a few clicks.
While it also has secure ripping capabilities, fre:ac's real strengths are its blazing speed, modern interface, and massive format support. It will happily chew through anything you throw at it—MP3, FLAC, AAC, you name it—making it a powerful all-in-one converter for your entire library.
Mastering Your Metadata
Let's be honest, one of the most tedious parts when you turn CDA files into MP3 is manually typing in every single track title, artist, and album name. It’s a total drag.
Thankfully, advanced rippers like EAC and fre:ac handle this brilliantly.
These programs connect to online music databases (like MusicBrainz or freedb) and automatically pull down all the metadata for your CD. We're not just talking about the basics; they grab album art, release year, and genre, ensuring your new digital library is perfectly tagged and organized right from the start.
Once your high-quality archives are created, you need to keep them safe from data loss. Learning how to backup your valuable audio archives is a crucial next step. And if you're looking to refine the sound even further, our detailed guide on how to improve audio quality can help.
Understanding Bitrates and Metadata for Perfect MP3s
Getting your CD tracks ripped into digital files is a great first step. But if you want to build a music library that’s clean, organized, and actually sounds good, you need to pay attention to two things that define every single MP3 you create: bitrate and metadata.
Getting these right is what separates a messy, low-quality collection from a pristine digital archive you'll enjoy for years.
Choosing the Right Audio Quality
Think of bitrate as the resolution for your audio. It’s measured in kilobits per second (kbps), and it directly controls how much data is used to capture the sound from the original CD track. More data means a richer, more detailed sound that’s much closer to what you’d hear on the original disc.
When you rip a CD, the software will ask you to choose a bitrate. This decision is always a trade-off between sound quality and file size. Ripping software typically offers MP3 bitrates from a basic 128 kbps all the way up to 320 kbps for near-CD quality. This compression is what made digital music so revolutionary—the ability to shrink files to just 5%-10% of their original size without a catastrophic loss in quality.
So, which one should you pick? Here’s a practical guide:
- 128 kbps: This is the absolute baseline. It's fine if you're just listening with basic earbuds or need to cram as many songs as possible onto a device. Audiophiles will immediately notice the sound feels a bit thin and lacks crispness.
- 192 kbps: For most people, this is the sweet spot. It offers a significant, noticeable jump in audio fidelity from 128 kbps without making the files massive. It's a fantastic balance of quality and size.
- 320 kbps: This is the highest quality setting for the MP3 format. If you’ve invested in good headphones or a decent speaker system, choose this. It's also the best option if you're creating a permanent archive and want the best possible sound from your collection.
Why Metadata Is So Important
Metadata is all the text information embedded inside your MP3 file. You might know it as ID3 tags. This includes everything from the artist name and album title to the track number, release year, and even the album art.
It's the digital equivalent of a CD's jewel case and liner notes.
Without proper metadata, your music library becomes a useless, unsearchable jumble of files named "Track 01.mp3." Good metadata transforms that chaos into an organized, browsable collection where you can find exactly what you want to hear in seconds.
Thankfully, most modern ripping tools are smart enough to automatically pull all this information from online databases like Gracenote or MusicBrainz, saving you from a mountain of manual typing.
While you're mastering bitrates and tags, you might find general guides on creating audio files helpful for a broader understanding of digital sound. And if your source isn't a CD but a video, our guide on a YouTube to MP3 transfer has some great tips.
Common Questions About Converting CDA to MP3
Even with the best tools, you can run into a few snags when ripping a CD. Let's tackle some of the most common questions that pop up, so you can get your audio converted without a headache.
One of the first questions people ask is, "Can I convert a .cda file I already copied to my computer?" The answer is a firm no. Those files are just 44-byte shortcuts that tell your computer where to find the audio on the physical disc. The actual music never left the CD, so you absolutely must have the disc in the drive to perform the rip.
Handling Problem Discs
What about that favorite album that’s seen better days? If a disc is badly scratched, your ripping software is going to struggle.
This is where more advanced tools like Exact Audio Copy really shine. EAC has a "secure mode" specifically designed to re-read problem areas over and over again until it gets a perfect copy. It takes longer, but it often solves the issue. If that fails, a gentle cleaning with a soft, lint-free cloth from the center outwards can sometimes work wonders.
Another common roadblock is copy protection. Some older CDs were designed to resist ripping. While many modern rippers can bypass basic protection, you might just need to try a different program if one fails. I've found that VLC is often surprisingly good at handling these stubborn discs.
A Quick Note on Legality: In many places, including the US, creating MP3 copies of CDs you own for your personal, non-commercial use generally falls under "fair use." Just remember, sharing those files is a copyright violation.
Bitrates for Spoken Word Content
While 320 kbps is the gold standard for music, it's complete overkill for audiobooks, lectures, or interviews. For spoken word content, a lower bitrate saves a massive amount of space without any noticeable drop in clarity.
Here are my go-to settings:
- 96 kbps is a fantastic choice for clear, crisp voice recordings.
- 64 kbps (mono) is even more space-efficient and is perfectly fine for most podcasts and audiobooks.
Choosing the right setting means your spoken audio files will be easy to listen to and won't hog your storage. Once you have those MP3s, you can easily turn them into text. Services that offer fast, accurate audio to text conversion are perfect for getting transcripts from your newly ripped lectures or interviews.


