
In a world saturated with visual content, just hitting 'record' isn't enough to make an impact. The real difference between a video that vanishes into the digital ether and one that genuinely connects with an audience lies in the details. It’s about the deliberate, thoughtful steps that come together to create a professional and polished final product. Mastering essential video production best practices isn't just for Hollywood studios anymore; it's a fundamental skill for anyone looking to stand out, from individual content creators and podcasters to corporate marketing teams and legal professionals.
This guide goes beyond generic tips to give you a solid roadmap for leveling up your content. We'll break down 10 crucial practices covering the entire creation process, from meticulous pre-production and scripting to advanced post-production techniques like quality control and smart distribution. Forget vague advice. Here, you'll find actionable, specific insights designed to streamline your process, boost your video quality, and ensure your message lands with your intended audience.
Whether you're aiming to increase engagement on social media, create clearer training videos, or deliver more persuasive client presentations, these principles are ready to be put into action. We’ll explore how to dial in your audio, perfect your lighting, manage multi-camera shoots, and add vital accessibility features like captions and transcripts. Let's dive into the proven techniques that will transform your video production workflow into a powerful content-creation engine.
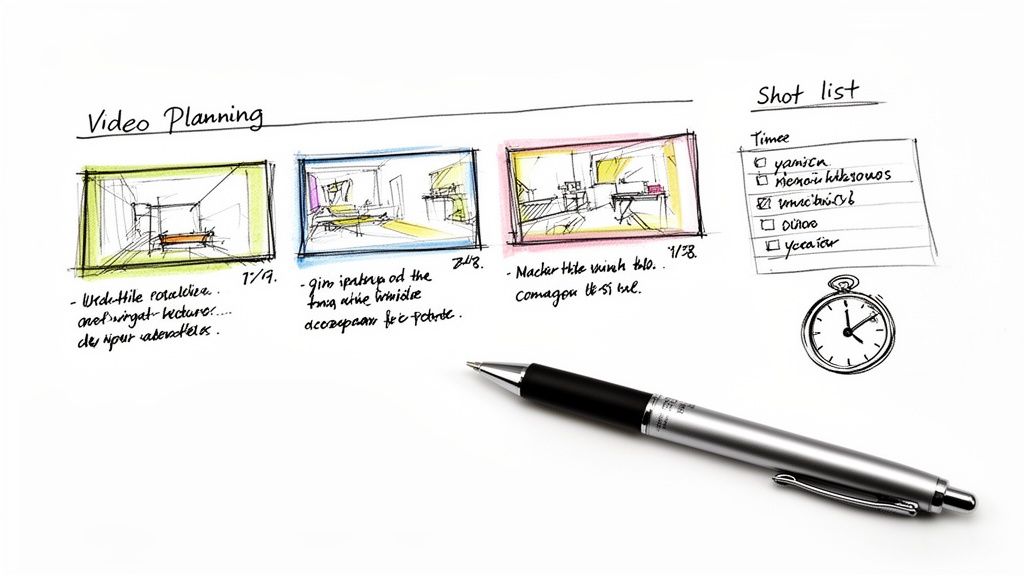
1. Plan and Script Your Content Before Recording
The foundation of any great video is a rock-solid plan. While "winging it" might work for a quick, casual clip, professional-quality content demands thoughtful pre-production. This means creating a detailed script or a structured outline that maps out your video from beginning to end. This is a core tenet of effective video production best practices because it forces you to clarify your message, organize your thoughts, and figure out the visual elements needed to tell your story.
A well-defined plan dramatically cuts down on filming time by eliminating guesswork and helps you capture all the necessary footage in one go. This efficiency carries straight into post-production, making the editing process smoother and much faster.
Why It's a Best Practice
Planning turns a jumbled idea into a clear, executable project. Think about the meticulously scripted format of TED Talks—it ensures every presentation is concise, powerful, and memorable. Likewise, top YouTubers often rely on detailed plans to structure their seemingly spontaneous vlogs, guaranteeing a compelling story arc.
For transcription services like Meowtxt, a clear script is a massive advantage. When the audio is clean and speakers are clearly identified, transcription accuracy soars, which means less time spent on manual corrections. This is a game-changer for anyone creating captions, subtitles, or searchable show notes.
Key Insight: A script isn't a creative straitjacket; it's a roadmap. It provides structure that actually frees you up to be more creative and confident during filming, knowing the essential points are covered.
How to Implement This Practice
- Create a Detailed Shot List: Don't just write dialogue. List every camera angle, shot type (e.g., wide shot, close-up), and visual action you need to capture.
- Label Speakers Clearly: In your script, use speaker names (e.g., "Host:", "Guest:") for every line. This directly helps transcription services identify and label speakers correctly.
- Estimate Segment Timings: Assign a target duration for each section to keep the video's pacing on track and ensure you stay within your desired total length.
- Plan for B-Roll: Intentionally list cutaway shots and supplementary footage needed to visually illustrate your points and break up "talking head" segments.
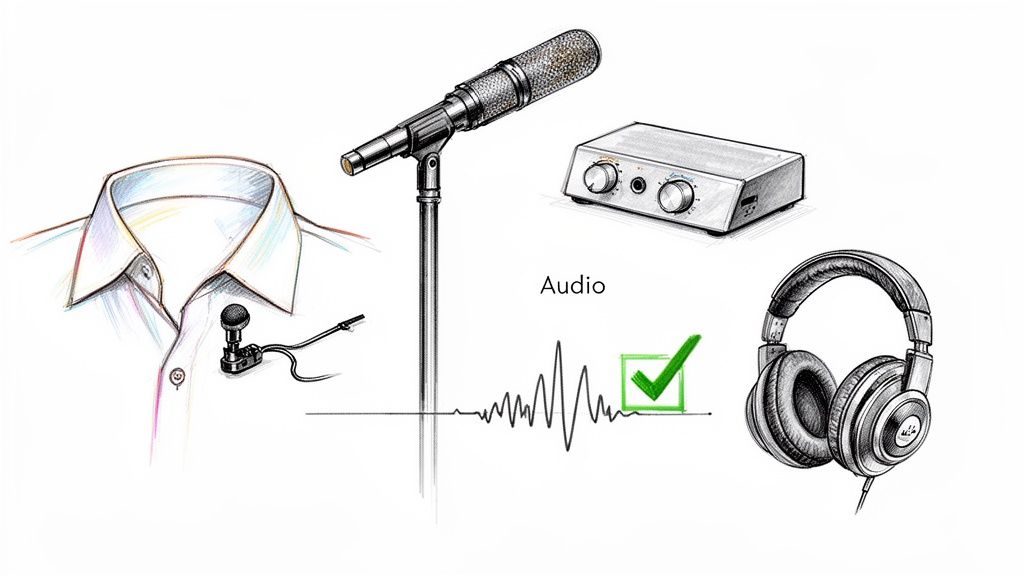
2. Invest in Quality Audio Recording Equipment
Viewers will forgive a slightly soft focus or less-than-perfect lighting, but they will click away almost instantly due to poor audio. This is why investing in quality audio gear is one of the most critical video production best practices. Clear, crisp sound makes your content feel professional and easy to follow, while distorted or muffled audio can make even the most beautiful video unwatchable.
High-quality audio input is the foundation for accurate post-production work, especially for services that rely on clean sound. It ensures that every word is captured with clarity, which is essential for creating precise captions, subtitles, and searchable transcripts.
Why It's a Best Practice
Great audio is what separates amateur content from professional productions. For example, top podcast studios use microphones like the Shure SM7B to capture rich, broadcast-quality vocal tones. Corporate video teams often use Sennheiser wireless lavalier systems to ensure speakers are heard clearly, even when moving around. This dedication to audio excellence builds credibility and keeps audiences tuned in.
For services like Meowtxt, the difference is night and day. Clean audio from a good microphone dramatically improves automated transcription accuracy, slashing the time and effort needed for manual edits. This is a game-changer for anyone producing transcripts for legal proceedings, educational lectures, or detailed meeting notes.
Key Insight: Audio is over half the video experience. Investing in a decent microphone will have a far greater impact on your production value than upgrading your camera.
How to Implement This Practice
- Use Directional Microphones: A shotgun or cardioid microphone is designed to capture sound from directly in front of it, effectively isolating your voice from distracting background noise.
- Maintain Proper Mic Placement: Position your microphone 6-12 inches away from the speaker’s mouth. This captures a strong, clear signal without picking up unwanted breathing sounds.
- Monitor Audio in Real-Time: Always wear headphones while recording to listen for issues like wind noise, clipping, or interference. It’s much easier to fix a problem during filming than in post-production.
- Record in a Quiet Space: Choose a location with minimal echo and background noise. Soft furnishings like carpets, curtains, and couches can help absorb sound and reduce reverberation. For more tips, check out our guide on how to improve your audio quality.
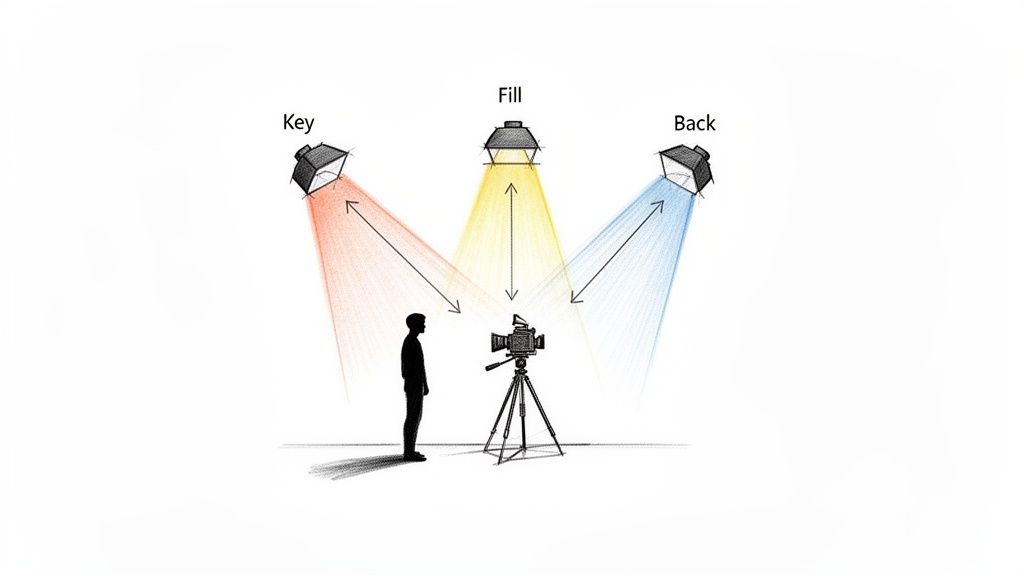
3. Optimize Lighting for Visual Clarity and Professionalism
Lighting is what truly separates amateur video from professional-grade content. It shapes the mood, clarity, and overall look of your production, directly influencing how your audience perceives your brand and message. Mastering lighting is a fundamental component of video production best practices because it makes sure your subject is seen clearly, creating a more engaging and trustworthy viewing experience.
Proper lighting makes your video look polished and high-quality, even when using a basic camera. It eliminates distracting shadows, adds depth to your shot, and ensures that visual information is communicated effectively, which is critical for tutorials, presentations, and interviews.
Why It's a Best Practice
Good lighting guides the viewer's eye and boosts visual appeal, keeping them watching longer. For instance, the deliberate and often complex lighting setups used by creators like MrBeast contribute to their videos' high-energy, cinematic feel. Similarly, professional podcast studios use controlled lighting to create a consistent, branded look for their video episodes.
For a service like Meowtxt, clear visuals are an important partner to accurate transcripts. When viewers can clearly see a speaker's expressions and lip movements, it reinforces the dialogue in the captions, improving comprehension and accessibility for everyone.
Key Insight: Lighting isn't just about visibility; it's about storytelling. A bright, even setup conveys professionalism and openness, while dramatic lighting can create suspense or focus. Control your light to control your narrative.
How to Implement This Practice
- Use the Three-Point Lighting Technique: Set up a Key Light (main light), a Fill Light (to soften shadows), and a Back Light (to separate the subject from the background).
- Match Color Temperature: Make sure all your light sources have the same color temperature (e.g., all 5600K for daylight) to avoid unnatural color casts on your subject.
- Diffuse Your Light Source: Use a softbox or bounce light off a white wall or reflector to create a softer, more flattering light and avoid harsh shadows.
- Avoid Overhead Lighting: Direct overhead lights often create deep, unflattering shadows under the eyes and nose. Position your main light source at a 45-degree angle to the subject instead.
4. Use Multi-Camera Setups for Varied Perspectives and Engagement
A single, static camera angle can get visually boring fast, causing viewer engagement to drop. Recording with multiple cameras captures the same moment from different angles, giving you dynamic perspectives and a ton of flexibility in the edit. This is one of the most impactful video production best practices for taking your content from amateur to professional, creating a more immersive and engaging viewing experience.
A multi-camera setup is especially powerful for interviews, panel discussions, podcasts, and product demos. It lets you seamlessly cut between a wide shot of the scene, a close-up of the speaker, and a reaction shot from the host or audience. This not only makes the video more visually interesting but also helps guide the viewer's focus and emphasize key moments.
Why It's a Best Practice
A multi-camera shoot offers both a safety net and creative freedom. If someone coughs or something distracting happens in one shot, you can just cut to another angle without breaking the flow. This technique is used everywhere, from big-budget productions like the Joe Rogan Experience, which uses multiple angles to capture every reaction, to corporate town halls that switch between a presenter and the audience.
For transcription services like Meowtxt, this practice is a huge help. When one camera clearly frames each speaker's face, it makes speaker identification much easier, leading to a more accurate and cleanly labeled transcript. This is vital for creating precise subtitles or searchable records of conversations with multiple people.
Key Insight: Multiple cameras aren't just for looks; they are a powerful storytelling tool. The ability to cut between angles gives the editor control over the pace, rhythm, and emotional focus of the final video.
How to Implement This Practice
- Synchronize Your Footage: Use a clapboard or a sharp, loud sound at the beginning of the recording to create a clear audio-visual spike. This makes it easy to sync all camera angles perfectly in your editing software.
- Vary Your Angles and Heights: Position cameras at different heights and angles (e.g., one wide, one tight on the speaker, one side-profile) to create depth and visual variety.
- Frame for Clarity: Ensure at least one camera provides a clear, unobstructed shot of each speaker's face. This is vital for both audience connection and accurate speaker labeling in transcripts.
- Plan Your Cuts: Think like an editor while filming. Know when you might want to cut to a reaction shot or a different perspective to keep the final product dynamic.
5. Establish Consistent Color Grading and Visual Style
Color grading is the art of stylizing the color and tone of your video to create a specific mood and aesthetic. It's much more than a simple filter; it’s a critical step that establishes a cohesive visual identity, enhances your storytelling, and boosts the perceived production value of your content. Implementing a consistent color treatment is a key part of professional video production best practices because it builds brand recognition and helps viewers instantly identify your work in a crowded feed.
A well-defined visual style makes your content look polished and intentional, signaling to your audience that you are a serious creator. This consistency not only strengthens your brand but also guides the viewer's emotional response, making your message more impactful.
Why It's a Best Practice
A signature color grade acts as a visual fingerprint for your brand. Tech reviewer MKBHD, for instance, uses a dark, contrasty look with pops of red that is instantly recognizable. Similarly, the warm, golden tones used by Casey Neistat contribute to his channel’s adventurous, cinematic vibe. This deliberate choice makes their content feel premium and distinct.
For services like Meowtxt that generate accurate SRT captions, a thoughtful color grade is also a practical plus. When designing your visual style, you can make sure your chosen caption text color and background have enough contrast to be readable for all viewers, including those with visual impairments.
Key Insight: Color grading isn't just about making things look "pretty." It's a powerful storytelling tool that communicates mood, directs attention, and builds a consistent brand identity that viewers can connect with.
How to Implement This Practice
- Create a Color LUT: Develop a custom Look-Up Table (LUT) that reflects your brand's color palette. Applying this same LUT to all your videos ensures perfect visual consistency.
- Shoot in a Flat Profile: Record in a "log" or flat color profile if your camera supports it. This captures the maximum amount of dynamic range, giving you far more flexibility during the color grading process.
- Set Correct White Balance: Always set a custom white balance before you start filming. This provides a clean, neutral starting point and saves you from a major color correction headache in post-production.
- Check Caption Contrast: When finalizing your grade, place a sample of your captions over the footage. Ensure the text is clearly legible against both the brightest and darkest parts of your video.
6. Maintain Proper Audio and Video Synchronization
Nothing screams "amateur" louder than audio that doesn't match the speaker's mouth movements. This sync issue is an instant distraction that undermines your content's credibility. Proper synchronization is a non-negotiable part of video production best practices, especially when you record audio and video on separate devices—a common technique for achieving higher quality sound.
Ensuring your audio and video are perfectly aligned is essential for a professional viewing experience. It also has a direct impact on your post-production workflow. A well-synced video makes editing smoother and is crucial for accurate transcription and captioning, where timing is everything.
Why It's a Best Practice
Proper synchronization is a fundamental standard in all professional media, from Hollywood films to top-tier YouTube content. When audio leads or lags behind the video, viewers can become disoriented and may simply give up on your content. Think of any professionally produced interview; the seamless match between what you see and hear is a key part of what makes it look polished.
For a service like Meowtxt, synchronization is absolutely critical. If the audio and video tracks are misaligned, the timestamps generated in the transcript won't match the visual events on screen. This makes it nearly impossible to use the transcript for editing, creating subtitles, or referencing specific moments in the video, defeating a major purpose of the service.
Key Insight: Synchronization is not just a technical task; it's an essential part of maintaining the viewer's immersion and trust in your content. Even a slight drift can break the illusion of reality.
How to Implement This Practice
- Create a Sync Point: Use a clapperboard or a sharp hand clap on camera at the beginning of every take. This creates a clear visual and audio spike that you can easily align in your editing software.
- Record Scratch Audio: Always record audio directly into your camera, even if you are using a separate, high-quality microphone. This "scratch" track acts as a perfect reference for syncing your primary audio.
- Sync Before You Edit: The very first step in post-production should be to synchronize your separate audio and video clips. Most editing software has built-in tools to do this automatically using the scratch audio.
- Check for Drifting: After syncing, spot-check your video at the beginning, middle, and end to ensure the sync holds throughout the entire clip, especially on longer recordings.
7. Create Detailed Metadata and Speaker Labels
Beyond the visuals and audio, the data about your video is a critical asset. Creating detailed metadata—including speaker names, titles, topics, and timestamps—is an organizational powerhouse that adds long-term value to your content. This documentation is a fundamental aspect of professional video production best practices because it transforms a simple video file into a searchable, accessible, and easily repurposed piece of media.
Properly labeling your content streamlines post-production workflows, improves internal organization, and can even boost SEO by making your video's subject matter clear to search engines. For any content featuring multiple speakers, clear identification isn't just helpful; it's essential for creating accurate and usable transcripts.
Why It's a Best Practice
Detailed metadata makes your content discoverable and manageable. Professional podcast networks, for example, use extensive metadata to categorize episodes, making it easy for listeners to find relevant content. Similarly, corporate training libraries rely on it so employees can search for specific modules or speakers.
For services like Meowtxt, providing speaker information is a game-changer. When the platform knows in advance who is speaking ("Host: Jane Doe," "Guest: John Smith"), its AI can assign dialogue with much higher accuracy. This drastically reduces the time needed to review and edit transcripts, ensuring they are immediately ready to be used as captions, articles, or show notes.
Key Insight: Metadata isn't just for archiving. It's an active tool that enhances your video's usability, searchability, and accessibility from day one. Think of it as the index and table of contents for your visual content.
How to Implement This Practice
- Introduce Speakers Clearly: Start your video by having speakers state their full name and title. This provides an audio reference that helps both human listeners and transcription AI.
- Use Consistent Labels: Create a standardized format for speaker labels (e.g., "Host:", "Expert:") and use it consistently across your script, file names, and project notes.
- Create a Metadata Template: Develop a simple spreadsheet or document to log key information for every video, including date, topic, keywords, and speaker details.
- Provide Speaker Info to Meowtxt: When submitting your files for transcription, include your list of speaker names. This simple step directly improves the accuracy of speaker identification in the final transcript.
- Use Descriptive File Names: Name your files with a clear convention, such as "YYYY-MM-DD_Topic_Speaker-Names.mp4," to make them instantly identifiable without needing to open them.
8. Optimize Video Format and Codec Selection for Distribution
Choosing the right video format and codec is a critical final step that balances file size, quality, and platform compatibility. The format (like MP4) is the container, while the codec (like H.264) is the method used to compress the data inside. Making the right choices is a fundamental part of video production best practices because it ensures your content looks its best and plays flawlessly for your audience, no matter where they're watching.
This technical decision directly impacts loading speeds, visual quality, and accessibility. A poorly chosen format can lead to playback errors, massive file sizes that are slow to upload and download, or reduced quality that undermines all your hard work in production.
Why It's a Best Practice
Proper encoding ensures maximum reach and a smooth user experience. YouTube, for example, recommends the H.264 codec in an MP4 container because it offers an excellent blend of high-quality compression and universal compatibility across devices. This standard guarantees that a video uploaded from a professional editing suite will play back reliably on a smartphone.
For services like Meowtxt, the source file's format is also crucial. Submitting a video in a widely supported format like MP4 with a clear audio track encoded at a high bitrate leads to faster processing and more accurate transcription. Clean, uncompressed audio data gives the AI a better foundation to work from, minimizing errors and the need for manual edits in your captions or transcripts.
Key Insight: Treat exporting as part of the creative process, not an afterthought. Your export settings are the final "performance" of your video, determining how the world will see and hear your work.
How to Implement This Practice
- Use H.264 in an MP4 Container: For web distribution on platforms like YouTube, Vimeo, and social media, this combination is the industry standard and offers the best compatibility.
- Maintain a High Bitrate for Quality: For 1080p video, aim for a bitrate of 8-16 Mbps. Higher bitrates preserve more detail, which benefits both visual quality and audio clarity for transcription.
- Match Your Source Frame Rate: If you filmed at 29.97 frames per second (fps), export at that same rate. Mismatched frame rates can cause stuttering or motion artifacts.
- Keep High-Quality Master Files: Always save a master version of your project in a high-quality format like ProRes or DNxHD. Use this master file to create compressed versions for different platforms, rather than re-compressing an already compressed file.
9. Implement Strategic Caption and Subtitle Integration
In today's digital world, video content needs to be accessible and engaging for everyone, everywhere. Adding captions and subtitles is a vital step that expands your audience, improves comprehension, and even boosts your video's search engine visibility. This practice makes content accessible to deaf or hard-of-hearing viewers and is essential for the huge number of users who watch videos on mute in public spaces or quiet environments.
Integrating captions is a core element of professional video production best practices because it addresses both accessibility and user experience. Subtitles, which offer translation for non-native speakers, can unlock global audiences and dramatically broaden your content's impact. The process is now simpler than ever, allowing creators to make their work more inclusive and discoverable.
Why It's a Best Practice
Strategic captioning is no longer an optional extra; it's a core part of distribution. Streaming giants like Netflix have set the standard, providing extensive subtitle options that allow their content to cross international borders seamlessly. Similarly, many top YouTube creators provide multilingual captions to build a global following, maximizing their viewership and engagement.
For corporate and educational videos, captions ensure compliance with accessibility standards and improve how well people retain information. When you need to get this done efficiently, using a service like Meowtxt to generate accurate SRT files from your audio is a game-changer. It automates what was once a tedious process, letting you focus on creating great content while ensuring it meets modern accessibility needs.
Key Insight: Captions and subtitles don't just serve a niche audience. They serve the modern viewer, who consumes content in diverse settings and expects a flexible, accessible viewing experience.
How to Implement This Practice
- Generate an SRT File: Use an automated service like Meowtxt to transcribe your video's audio and export a timed SRT (SubRip Subtitle) file, the industry standard for captions.
- Position Captions Thoughtfully: Place captions where they won't obscure critical on-screen visuals, like lower-thirds or product demonstrations.
- Prioritize Readability: Choose a clean, legible sans-serif font (like Arial or Helvetica) and ensure sufficient contrast against the video background. For a deeper dive, you can learn more about how to caption videos effectively.
- Check Formatting on All Devices: Preview how your captions appear on mobile, tablet, and desktop screens to ensure they are readable everywhere.
- Include Speaker Labels: For videos with multiple speakers, use labels (e.g., "Sarah:") to eliminate confusion and improve clarity. To boost accessibility and engagement, follow this practical guide to add subtitles to video.
10. Establish a Post-Production Workflow and Quality Control Process
The work isn't done when the camera stops rolling. An organized post-production workflow is the assembly line that transforms raw footage into a polished final product. This structured process involves a series of quality control checks, including editing, color correction, audio mixing, and reviewing generated assets like transcripts and captions. Implementing this is a critical component of video production best practices because it ensures consistency, catches errors, and upholds your quality standards across all projects.
A systematic approach prevents costly mistakes and saves a huge amount of time by creating a predictable, repeatable path from raw media to final delivery. This is especially crucial for teams, as it ensures everyone follows the same steps for a uniform output.
Why It's a Best Practice
A defined workflow prevents the "what's next?" paralysis and turns post-production into a streamlined, efficient process. For example, professional podcast networks often have multi-stage review cycles where one person handles the initial edit, another mixes the audio, and a third performs a final quality assurance (QA) check. This division of labor catches more errors and ensures specialized attention at each step.
For users of Meowtxt, integrating transcript review into this workflow is essential. After generating a transcript from your video, the QA step involves proofreading it against the audio to correct any inaccuracies in terminology or speaker identification. This refined transcript then becomes a reliable source for creating perfectly synchronized and accurate captions, a key factor for accessibility and engagement. For more detail on creating accessible content, see our guide on the essentials of converting video to text.
Key Insight: Quality control isn't about finding fault; it's about guaranteeing excellence. A structured review process is your final opportunity to elevate your content from good to great before it reaches your audience.
How to Implement This Practice
- Create a Post-Production Checklist: Document every step, from file import to final export, and use it for every project to ensure nothing is missed.
- Proofread All Text and Captions: Carefully review all on-screen text, titles, graphics, and subtitles for spelling and grammar. To effectively implement this, consult a comprehensive guide on how to add captions to videos.
- Verify Audio and Color Consistency: Check for consistent audio levels, remove background noise, and ensure color grading is uniform across all shots and scenes.
- Implement a Two-Person Review: Whenever possible, have a second person review the final video. A fresh set of eyes is invaluable for catching errors you might have overlooked.
10-Point Comparison of Video Production Best Practices
| Item | 🔄 Implementation Complexity | ⚡ Resource & Efficiency | ⭐ Expected Outcomes | 📊 Ideal Use Cases | 💡 Key Advantages / Tips |
|---|---|---|---|---|---|
| Plan and Script Your Content Before Recording | Medium — requires upfront planning and structure | Low equipment; moderate time investment upfront improves editing speed | Clearer message, fewer retakes, higher transcription accuracy | Scripted talks, educational videos, interview prep | Use speaker labels and time markers to boost Meowtxt accuracy |
| Invest in Quality Audio Recording Equipment | Medium — needs audio knowledge and technique | High equipment cost; large efficiency gains in editing/transcription | Much higher transcription accuracy (~97.5%), less noise removal | Podcasts, interviews, professional tutorials | Use directional mics, monitor live audio, record backups |
| Optimize Lighting for Visual Clarity and Professionalism | Medium — technical setup and testing required | Medium equipment and space; improves caption readability | More professional visuals, better viewer retention | On-camera hosts, corporate videos, tutorials | Match color temperature and test lighting with camera |
| Use Multi-Camera Setups for Varied Perspectives and Engagement | High — synchronization and multi-track editing complexity | High equipment/storage needs; increases editing flexibility | Dynamic videos, improved speaker context and backup footage | Panel discussions, interviews, live events | Sync timecode and label cameras for easy editing and Meowtxt alignment |
| Establish Consistent Color Grading and Visual Style | Medium–High — requires skill/software and monitoring | Medium software/time investment; improves brand consistency | Polished, recognizable visual identity and caption contrast | Branded series, cinematic content, marketing videos | Create LUTs and ensure captions maintain sufficient contrast |
| Maintain Proper Audio and Video Synchronization | Medium — requires procedures and checks | Low additional equipment; time for verification prevents errors | Accurate timestamps and SRT alignment, professional UX | Multi-device shoots, edited podcasts with video | Use clapperboards/timecode and verify sync before final export |
| Create Detailed Metadata and Speaker Labels | Low–Medium — needs discipline and templates | Low time cost per project; high downstream efficiency | Searchable, well-attributed transcripts and better translations | Interviews, training, large-team recordings | Introduce speakers on camera and provide labels to Meowtxt |
| Optimize Video Format and Codec Selection for Distribution | Low–Medium — codec knowledge; export decisions | Low equipment; encoding time; speeds uploads and processing | Faster Meowtxt processing, balanced quality and file size | Platform-specific delivery, podcast/audio distribution | Use MP4/H.264 for compatibility; export WAV/MP3 for audio-first content |
| Implement Strategic Caption and Subtitle Integration | Low (with Meowtxt) — styling choices required | Low time with automated SRT; high accessibility ROI | Improved accessibility, SEO, multilingual reach | Social media, global audiences, accessibility-focused content | Position captions to avoid blocking visuals; use Meowtxt for SRTs |
| Establish a Post-Production Workflow and Quality Control Process | Medium–High — process design and staffing needed | Medium resources (team/time); prevents rework and errors | Consistent quality, fewer publish-time issues, ready transcripts | Networks, recurring series, professional production | Use Meowtxt transcripts in QC checklist and have second reviewer |
Putting It All Together: Your Blueprint for Better Video
Navigating the landscape of video production can feel like orchestrating a complex symphony. From the initial spark of an idea to the final upload, dozens of moving parts must align perfectly. We've explored ten foundational video production best practices that serve as your sheet music, guiding you from a chaotic process to a streamlined, professional workflow. These aren't just isolated tips; they are interconnected pillars that support the entire structure of your content creation efforts.
Think of it as a chain of quality. A brilliant script (Practice #1) loses its power with poor audio (#2). Crystal-clear sound is undermined by shadowy, unprofessional lighting (#3). Even with perfect audio and lighting, a static single-camera shot might fail to hold audience attention like a dynamic multi-camera setup (#4). Each practice builds directly on the one before it, creating a cumulative effect that elevates your final product from mediocre to masterful. This integrated approach is what separates amateurs from professionals.
From Good Intentions to Great Execution
The real challenge lies in turning this knowledge into a consistent habit. It's easy to read about the importance of color grading (#5) or proper A/V sync (#6) and nod in agreement. It's another thing entirely to build these checks into every single project. The key is to create a system—a repeatable blueprint that takes the guesswork out of the process.
Start small. Pick two or three practices from this list to perfect in your next project.
- For Pre-Production: Make non-negotiable time for scripting and storyboarding. A detailed plan prevents costly mistakes and unfocused content down the line.
- For Production: Focus on capturing the best possible raw material. Prioritize clean audio and balanced lighting above all else. You can't fix fundamentally flawed source material in post-production.
- For Post-Production: Create a standardized workflow (#10). Develop a checklist that includes everything from metadata entry (#7) and format optimization (#8) to your final quality control pass. This discipline ensures nothing falls through the cracks.
Adopting these video production best practices does more than just make your videos look and sound better. It builds trust with your audience. Professional quality signals that you value their time and are serious about delivering value. It makes your content more accessible through strategic captioning (#9), expanding your reach and demonstrating inclusivity. Ultimately, mastering this process allows you to connect more deeply with your viewers, whether they are students, clients, legal professionals, or YouTube subscribers.
This journey is one of continuous refinement. Your first attempt at a multi-camera setup might be clumsy. Your initial post-production workflow may feel slow. But with each project, you will become more efficient, your technical skills will sharpen, and your creative vision will be realized more fully. The goal isn't just to make one great video; it's to build a reliable system that empowers you to create exceptional content, project after project, consistently and confidently.
Ready to streamline a critical part of your post-production workflow? Automate your transcription and captioning with meowtxt. By integrating our fast, accurate, and developer-friendly API, you can effortlessly implement one of the most crucial video production best practices and make your content more accessible in minutes. Visit meowtxt to see how we can help you focus more on creating and less on tedious manual tasks.


